MT300 Precision Pressure Monitor
The MT300 Digital Manometer functions as a precise pressure calibrator or pressure reference for lab and field use. Its 0.01% accuracy, long-term stability, and broad application versatility support a wide range of applications. At its core is Yokogawa’s proprietary silicon-based resonant sensor, providing exceptional sensitivity, minimal drift, and consistent performance.
Able to measure both liquids and gases at low pressures, the MT300 surpasses typical dry-gas-only solutions. It also supports differential pressure measurement with a single unit, reducing system complexity and setup time. In addition to its high accuracy and versatility, MT300 can operate on battery power, enabling easy portability and reliable performance in both lab and field environments. With its high performance and efficient design, the MT300 delivers industry-leading value for precision calibration, diagnostics, and test environments.
High Accuracy and Long-Term Stability
Absolute Accuracy of Pressure Measurement:0.01%
Accuracy Guarantee Period: 12 months
The MT300 delivers an exceptional 0.01% relative accuracy in pressure measurement. Backed by decades of accumulated measurement data, we guarantee this level of accuracy for up to 12 months, ensuring reliability and confidence in every application.
Proprietary Silicon-Based Resonant Sensor
![]() At the core of the MT300 is Yokogawa’s self-developed silicon-based resonant sensor, engineered for high accuracy, exceptional resolution, and long-term stability.
At the core of the MT300 is Yokogawa’s self-developed silicon-based resonant sensor, engineered for high accuracy, exceptional resolution, and long-term stability.
Extremely low temperature dependency
The sensor features two vibrators formed using semiconductor fabrication techniques on a silicon wafer, driven by a permanent magnet and housed in a vacuum to minimize energy dispersion. When pressure is applied to the silicon diaphragm, it distorts the vibrators, altering their resonant frequencies. By detecting the differential frequency response, the sensor accurately calculates pressure while compensating for environmental factors such as temperature and humidity.
High sensitivity and resolution and superior long term stability
This architecture, combined with the inherent flexibility of single-crystal silicon, achieves a high Quality factor, delivering superior measurement stability and precision across a broad range of applications

Compatible with International Metrology Standards
International Comparison
The Yokogawa’s pressure sensor and the MT series are adopted as a Transfer Standard for many CC-level and the regional-level (for example APMP) international comparisons of pressure standards based on the enhanced performance of digital pressure gauges and the evaluation result of long term stability.
* Transfer Standard:
A standard used as a transfer equipment to compare standards.

Low-Pressure Liquid and Gas Measurement
 The MT300 is engineered to measure both liquids and gases at low pressures, expanding its use beyond traditional dry-gas-only instruments. This capability is especially valuable in applications involving fluid-based cooling, leak testing, or flow validation.
One key example is electric vehicle (EV) development, where the MT300 enables high-accuracy measurement of pressure loss across coolant flow paths. These systems manage thermal loads in motors, batteries, and inverters. A single MT300 differential pressure model can accurately capture ∆P values with 0.01% accuracy, making it ideal for optimizing energy efficiency and thermal performance.
The MT300 is compatible with non-flammable, non-explosive, non-toxic, and non-corrosive fluids, excluding substances defined under Directive 2014/68/EC Article 13(1)(a), ensuring safe integration into diverse test environments.
Differential Measurements with a Single Unit
The MT300’s integrated differential pressure capability allows users to perform accurate ∆P measurements without the need for two separate instruments. This reduces system complexity, saves bench space, and simplifies data acquisition, especially in use cases like HVAC airflow testing, wind tunnel studies, or component pressure drop validation.
Supports Field Calibration
The MT300 includes features that make it suitable for on-site transmitter calibration and maintenance. It provides a 24 VDC output to power pressure transmitters, and can directly measure 1–5 V or 4–20 mA signals.
Unlike handheld calibrators, the MT300 brings laboratory-grade accuracy into field environments, making it the preferred choice for high-precision calibration, verification, and loop checks where measurement confidence is critical. With the optional Li-ion battery, it supports up to 6 hours of cordless operation, enabling use in remote or mobile setups.
Rich Lineup
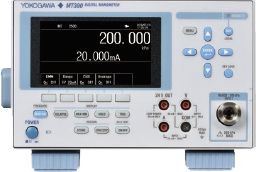
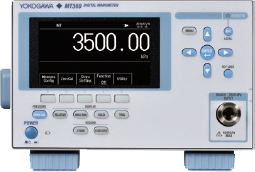
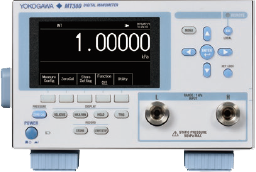
Choose from a variety of model based on your application needs.
|
|
|
|
|||||
| Gauge pressure model |
Absolute pressure model |
Differential pressure model |
|||||
| 6 ranges | 3 ranges | 4 ranges | |||||
|
|
|
*1 Shield gauge pressure model
Informative Color Display
A color dot matrix LCD displays measurement data and analysis with high resolution and high visibility.

Front Panel / Rear Panel

High Precision Measurements
High resolution display (When /R1 is selected.)
By using a high resolution display, pressure measurements can be more accurately displayed and visualized. In addition, the increased resolution, especially in calibration environments, reduces the uncertainty of the entire calibration process.

High speed measurement (When /F1 is selected.)
Rapid pressure changes and transient responses requires high speed and reliable measurements. Depending on the application, you can choose your measurement speeds from three different modes, normal, medium or high speed.
Synchronous measurement
Using the synchronization features, you can collect data and display measurements from multiple units. Measurements can be captured and correlated at high speed with high accuracy and confidence.
Application:
In the performance testing of vacuum cleaners, the suctionforce is calculated from the amount of suction-air in the pressure equalizing container and the degree of vacuum. The amount of intake-air can be obtained by measuring the differential pressure via a pitot tube, and the degree of vacuum can be obtained by measuring the absolute pressure. With the /F1 option, the dynamic characteristics can be captured at high speed, with accurate results, by synchronously measuring these two values from two MT300s.

Support for Efficient Works
Leak test feature
The Leak-test feature can be used to measure pressure change or leak rate within the measurement period. It can be used to check the tightness or integrity of a pressure measurement system.
|
|
| Start: Pressure value and time when started Stop: Pressure value and time when stopped Time: Measurement time Delta: Difference of pressure value between started and stopped Rate: Deffence of pressure value per minute |
 |
Scaling
The scaling function can be used to assign customer specific coefficients to the measured values. Depending on the application, you can display your own conversion value. Scaling coefficient A and offset B are determined according to the following equation. Set the scale values for the upper and lower span limits.

※ If you change the unit, set scaling coefficient A and offset B again.
Statistical processing
You can apply statistical processing to the data acquired. Find and display the maximum value, minimum value, average value, and standard deviation for the measured data. When error data is detected, the number of error data within the measurement range can be recorded and displayed.
|
|
||
| Max:Maximum value | AVG:Average value | ERR:Number of error data |
| Min:Minimum value | σ:Standard deviation | |
Support for Linkage with External Devices
D/A output (When /DA is selected)
The Digital-to-Analog (D/A) option, makes it easy to output measured pressure values to an external terminal going to a measurement system or a recorder. The output update interval can be set to 250 μs in combination with the /F1 option (in medium-speed/high-speed modes).

Example of the waveform differences in measurement modes
D/A Scaling (When /DA is selected)
Any range within the pressure measurement ranges is output in full scale of the D/A output range.
Minute changes in pressure can be captured with high resolution.

Measurement of minute changes in atmospheric pressure
Tilt alarm and Tilt Correction
(Absolute pressure model)
Tilt alarm
This function detects the orientation state of the absolute
pressure model body and displays a warning.
Tilt correction (Enabled when the tilt alarm is on.)
Stores the vertical orientation offset and compensates measurement values during vertical use.*1
*1 Displays a warning if this function is set to ON in the horizontal orientation.
Indication
Blue value: Tilt correction is working properly in the vertical orientation.
Red value: The combination of the installation orientation and the tilt correction on/off state is inappropriate.
| Vertical Orientation | Horizontal Orientation | ||
| Tilt Alarm ON |
Tilt Corr ON |
 |
 |
| Tilt Corr OFF |
 |
 |
|
Comparator output
Using external I/O terminals, you can output control signals, based on set upper and lower limits and judgement criteria’s on measured values. These features allow automation of production and/or inspection lines for pressure-related products.
Interfaces
Communication Interfaces such as GPIB, USB (type-B), and ETHERNET are available as standard features. Communication commands are compatible*1, *2 with existing models*3, making it easy to expand or update your existing measurement system.
*1: Some command cannot be used.
*2: Compatible commands cannot be used when -G07, -G08, -A05, -A06 are selected.
*3: MT210/MT210F/MT220
Support for Field Device Calibration and Maintenance Work
Calibration involves inputting the same pressure level to both a calibrator and a transmitter and comparing the transmitter output with a value measured by the calibrator. The MT300 come with the functions you need for such calibration or maintenance work in the field.
- Outputting 24 VDC for the supply of transmitter
- Measuring transmitter output (1 to 5 V or 4 to 20 mA selective)
- Built-in communication resistance enables ON/OFF switching.
Above functions can be available when /DM is selected.
- It is possible to bring it out without AC power by Li-ion battery operation.
Running time: Approx. 6 hours with all functions turned on Charge time: Approx. 6 hours
Above function can be available when /EB is selected or add them as accessory after ordered.
 |
Reduced energy and emission of CO2 about 19% compared to the previous model. Results of Life Cycle Assessment Results of Life Cycle Assessment |
366921 BNC to Banana-Jack (Female) Adapter 42V
BNC-Banana-jack (female) adapter. Use for circuits having voltage levels no greater than 42 V.
Ventilator pressure loss between supply pressure & the pressure sensor must be checked to ensure accurate measurement of switching timing for proper valve operation between exhalation & inhalation.
Brochures
- MT300 Digital Manometer (2.0 MB)
Instruction Manuals
- MT300 Digital Manometer User’s Manual (3.6 MB)
- MT300 Digital Manometer Getting Started Guide (3.5 MB)
- MT300 Digital Manometer D/A Output, Voltage/Current Measurement Adjustment Method (571.5 KB)
- MT300 Digital Manometer Firmware Update Procedure User’s Manual (245.1 KB)
Specifications
- Results of Life Cycle Assessment for MT300 (405.2 KB)
Software
- MT300 Visual C/C++/C#/VB Sample program
- Excel VBA sample program for MT300
- TMCTL
- USB Drivers
- LabVIEW drivers for MT300 ( NATIONAL INSTRUMENTS Web Page )
Firmware
Drawings
- MT300 Digital Manometer (470.7 KB)


